This tutorial explains how to use text tags (pieces of text in a certain format) to dynamically specify where the fields should appear in your documents and how to send out these documents for signing using our eSignature API (Application Programming Interface).
What Are Text Tags
Text tags are just pieces of text in a certain format that you dynamically include in your documents when you generate them to specify the positions for signature fields, text fields, date fields etc.
When you send out a document with text tags for signing, DigiSigner parses the document’s content, finds all the text tags and replaces them through fields.
When to Use Text Tags
What are the benefits of using text tags compared to templates or to dynamic specifying of field coordinates directly in your signature request?
Templates are great when the positions of your fields are fixed and don’t change from one signature request to another. But if they do change you need to be able to indicate the field positions dynamically. You can do this by specifying the exact field coordinates in your signature request, but sometimes it is not practical or even not possible.
Imagine that you need to put a signature field right under a dynamically generated paragraph of text. Depending on the paragraph size the field position could vary.
This is where text tags could help you. Just put your text tag in the form of [s:role] under your paragraph while you are generating your document and our service will automatically recognize it and convert it to a signature field.
Format of Text Tags
A text tag is a piece of text starting and ending with a square bracket, between the brackets there are two parameters separated with a colon.
Here are the examples:
[s:role] – signature field
[t:role] – text field
[d:role] – date field (prefilled with the current date)
[c:role] – checkbox field
[i:role] – initials field
The first parameter in a text tag is the letter that indicates the type of the field. This letter can have five different values for the corresponding field types: s, t, d, c, i.
The second parameter is the signer’s role, which allows you to specify which signer will fill in this particular field. The role can be any string of your choice (but should not contain a colon).
Imagine that your document needs to be filled out by two signers, one is an employee and the other is a manager. In this case you can use the role employee for all the fields that should be filled in by an employee, and the role manager for all the fields that should be filled in by a manager.
For example [s:employee] will be a signature field for an employee, and [t:manager] will be a text field for a manager.
You will use these roles later in your signature request to specify which signer will have which role while signing the document (and therefore what fields they will have to fill in).
Signer roles are case sensitive (‘Employee’ and ’employee’ are two different roles).
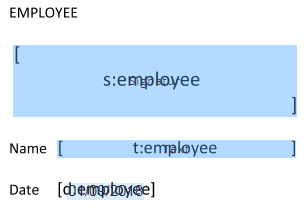
Here is a sample document, that shows the usage of text tags.

We have two signer roles here: employee and manager. For each signer we added three fields: a signature field, a text field and a date field.
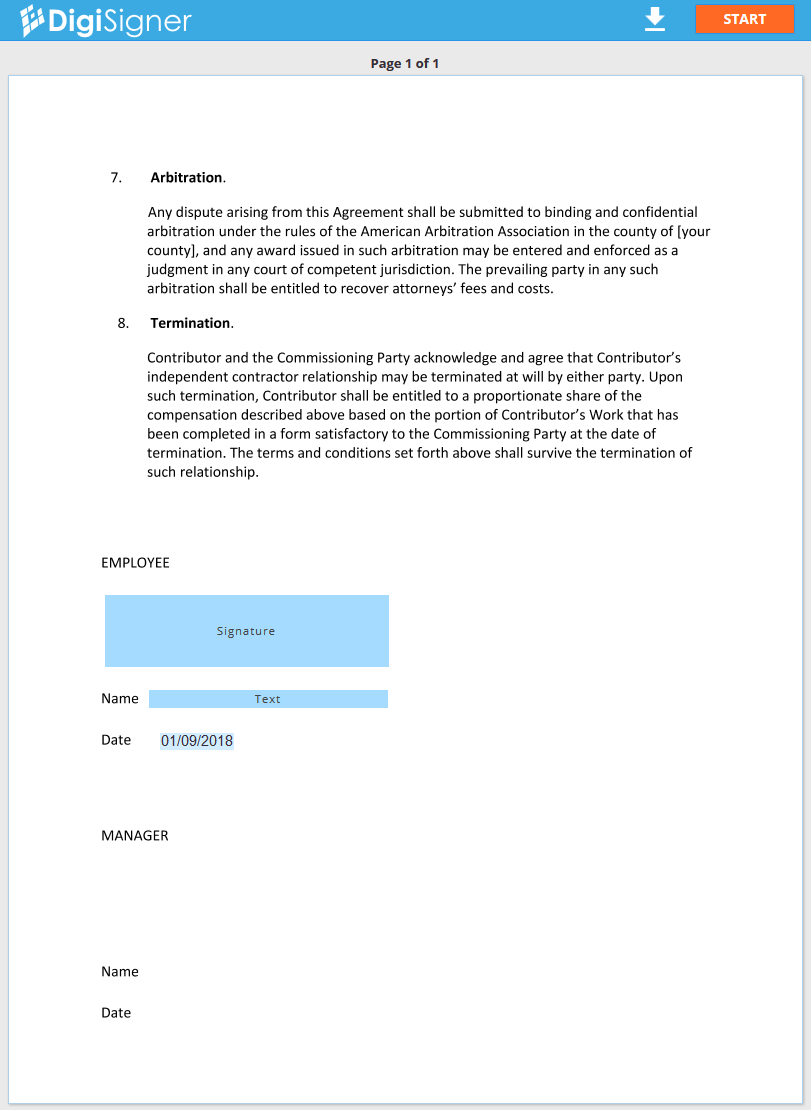
This is how the same document will be displayed when opened by an employee via our service.
As you probably already noticed you can add spaces inside your text tags to adjust field sizes, use fonts of different sizes or even place your text tags over multiple lines.
Send Signature Request
After you have generated your document with text tags you will need to send it out for signing. You can use the following sample code to do it.