To follow the tutorial you will need to install the latest version of DigiSigner which is available on our download page for Windows, Mac and Linux.

To skip the theoretical part just go direct to PDF signing instructions.
Contents
What is a digital signature and why you may need it?
What is a digital certificate?
How to generate a digital certificate
Buy a certificate from a certificate authority
How to create a visible signature
How to create an invisible signature
Visible signatures in predefined signature fields
How to verify a signature
What is a digital signature and why you may need it?
First we start with an electronic signature. An electronic signature is an electronic equivalent of an ink signature on normal paper documents. The examples of simple electronic signatures are a picture with your handwritten signature embedded in some document or even your name in the end of an email message. Unfortunately with simple electronic signatures you don't know for sure, that the document or message was signed by the person, whose name you see in the signature. There is also no guarantee that the text was not tampered in transit.
Often it is important to know that a document was signed by a known person and it was not altered in transit. It is the case for different financial documents, contracts, invoices or if you just need an additional guarantee. Here is where a digital signature comes into play.
A digital signature is a special kind of an electronic signature which guarantees the following:
1. The signed document was signed exactly by the person whose name is in the signature.
2. The signed document was not altered in transit.
As you can see, a digital signature has two very important advantages over an ordinary electronic signature. But it comes also at its price. To create a digital signature you need a digital certificate, also known as a public key certificate or identity certificate.
What is a digital certificate?
First I would like to tell you about the concept behind a digital signature. Imagine you invented a new kind of safe. Your safe has two different keys. With the first key you only can close the safe, but not open it. With the second key you only can open the safe, but not close it. We assume also that the key, which can close the safe, is kept in secret by you. We call it your private key. The key which can open the safe, is made public by you. Everybody can have a copy of it and you gave one also to all your friends. We call this key your public key. You could say at this point, that such a safe would not make much sense, because everybody can open it. Let's see how we can use it.
Imagine you want to send a letter to your friend and you want to make sure that the letter will not be changed during transit. You put the letter in your special safe and send the whole safe to your friend. If your friend receives a closed safe and manages to open it using his copy of your public key, than he can be sure that the letter in the safe is from you and it was not changed in transit. This is because only your safe can be opened using your public key and you are the only person, who can close your safe. If some third person opens the safe (using your public key) and changes the letter, he/she can't close the safe anymore (you keep your private key secret). If this person puts your letter in another safe, closes it and sends it to your friend, than your friend will not be able to open it using his copy of your public key (we assume it is very hard to build a safe, which can be opened by a particular key).
This is exactly how a digital signature works. You have two digital keys, one private and one public. Every key is just a sequence of bytes. The private key is kept secret and the public key is available for everybody. You use the private key to digitally sign documents. Imagine here that by signing you put a document in an imaginable safe and close it with your private key. Please note, that the content of the signed document is still visible to everybody, so we use here some kind of a transparent safe. The public key is used to verify the digital signature to make sure the signed document was not altered in transit and was signed by a known person. Imagine here that by verifying you check if the safe is still closed and can be opened using a public key from a known person.
But what is a digital certificate? Digital certificate is a file which contains a public key plus some information about you, like your name, organization, location, email address etc. In our example it corresponds to a public key with your name (and maybe more information) engraved in it. In reality you give your friend not a public key, but a certificate (public key with your name), and your friend has a lot of certificates from different people. When he receives a signed document, he checks which public key from which certificate "opens" the document and then looks at the information in the certificate (name engraved in the key) to see who signed the document. Of course it's normally done automatically by your software.
The whole scheme I described here has also a special name. It is called Public Key Infrastructure (PKI).
How to generate a digital certificate
There exist many kinds of certificates. In this tutorial we are discussing the most common certificate type - X.509 certificates. This is exactly what you need to create standard digital signatures.
When people say you need a digital certificate to sign documents, they actually mean you need a pair - a digital certificate and a corresponding private key. As you know now, this is the private key, which is used to sign documents. The certificate (with its public key) is used to verify digital signatures and to determine the signer. From now on if we talk about certificate generation, we mean the generation of a pair - a certificate and a corresponding private key.
To generate a digital certificate you can use DigiSigner certificate generation functionality. All you have to do is fill in the certificate generation form and press Generate button. That's all. For more information please see How to create a visible signature.
Of course it is also possible to generate certificates using open source tools like openssl or keytool. Click here to see how to generate digital certificates using keytool.
During the generation process you enter some information about yourself and the result of the generation is a so called key store file. It is a password protected file, which contains a pair - your certificate with a corresponding private key. Next time you generate a certificate you can use an existing key store file. You don't need every time a new file for each pair.
Please note, that the certificates you generate yourself, work very well only in closed environments, say, among your friends or colleges. Imagine your name is James Bond. You generate a certificate for this name and give it to all your friends. When your friends receive signed documents from you, they use your certificate to make sure the documents were signed by you. So they know the documents were really signed by James Bond. But at some moment you decide to send a signed document to a third person, who doesn't know you personally. Even if you send your certificate together with a signed document (certificates are normally embedded in the document during the signing process), this person can only determine, that the document was signed by someone, who generated the certificate for the name James Bond. Was it really James Bond? That's the question.
To solve this problem you can buy a certificate from a certificate authority.
Buy a certificate from a certificate authority
There are organizations, that can identify you (this is normally an offline process) and then issue for you a certificate with your personal information. These organizations are called certificate authorities (CA). The only difference between the certificates issued by CAs and those you generate yourself is that CAs digitally sign the issued certificates using their private keys to certify that the information in the certificates is correct. Certificate authorities are usually big known companies like VeriSign or GlobalSign and people trust them. The certificates of such companies are already included in your operating system.
Now imagine you digitally sign a document using a certificate issued by some CA and send this document to a third person. This person will receive the signed document from you and also your certificate. He/she will first verify if the document was really signed using your certificate and was not altered in transit. Then this person will take a look at your certificate and notice that it is signed by a CA. It is possible to determine it, because the certificate of the CA is already installed in the operating system. As people normally trust to CAs, this person trusts, that your certificate was issued by the CA for somebody, whose personal information is exactly as in the certificate. So the third person knows that the document was really signed by somebody, whose name (and other information) he/she finds in your certificate. Of course all these steps are done automatically by your software and you get just the result presented.
During the issue process the certificate (with its private key) is usually generated in your browser. But there is an alternative process. Many people prefer to generate the certificates itself using their favorite tools (see the section How to generate a digital certificate) and then get them signed by a CA. This process is a little bit more complicated, but I personally find it more safe. So you can be completely sure that your private key never leaves your computer.
I tested the certificate issue process from GlobalSign and found it pretty intuitive and well documented (you need a PersonalSign Digital ID product). You can also theoretically order digital certificates from Thawte or VeriSign, but I didn't manage to find the certificate product at their web sites, that would let me digitally sign PDF documents.
How to create a visible signature
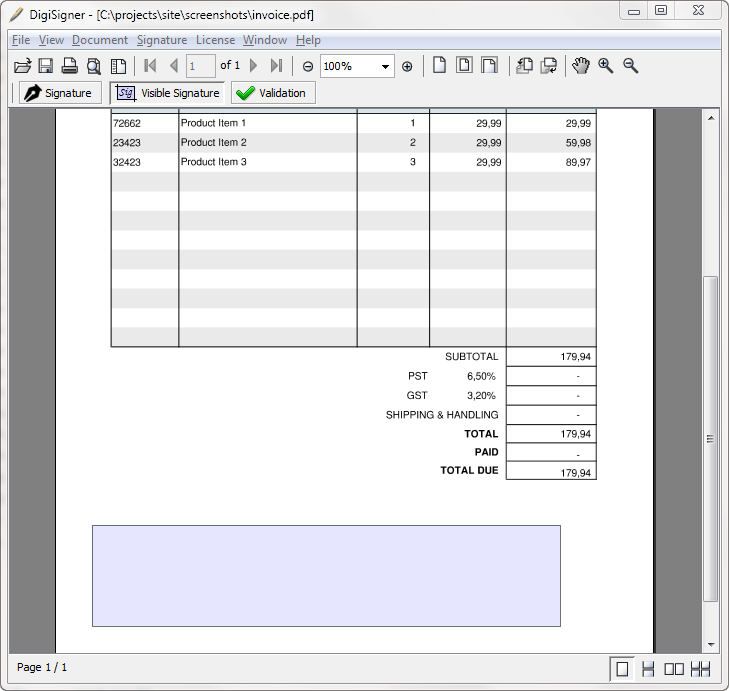
First we have to start DigiSigner and open the PDF document we want to sign. You can open the file through File -> Open -> File... or just press Ctrl+O. On Windows you can right-click the file you want to open and choose Open with DigiSigner option. DigiSigner will display the chosen document.

(Click on image to enlarge)
Then just go to the page where you want to place your digital signature using Page Up, Page Down or Scroll buttons. You can also enter the page number in the toolbar and press enter.
Now you should choose the Signature -> Visible Signature... menu option or just press Ctrl+V. You can also press the Visible Signature button in the toolbar.

As you see the cursor changed to a cross to let you define a signature field. Click anywhere in the document where you want to place your signature and drag the cursor while holding the mouse button. Then release the button to create a new signature field.
(Click on image to enlarge)
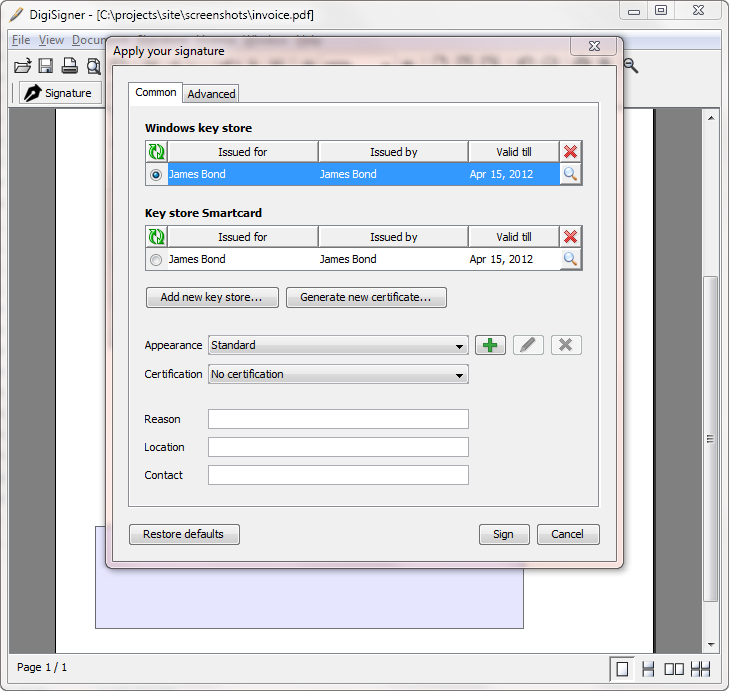
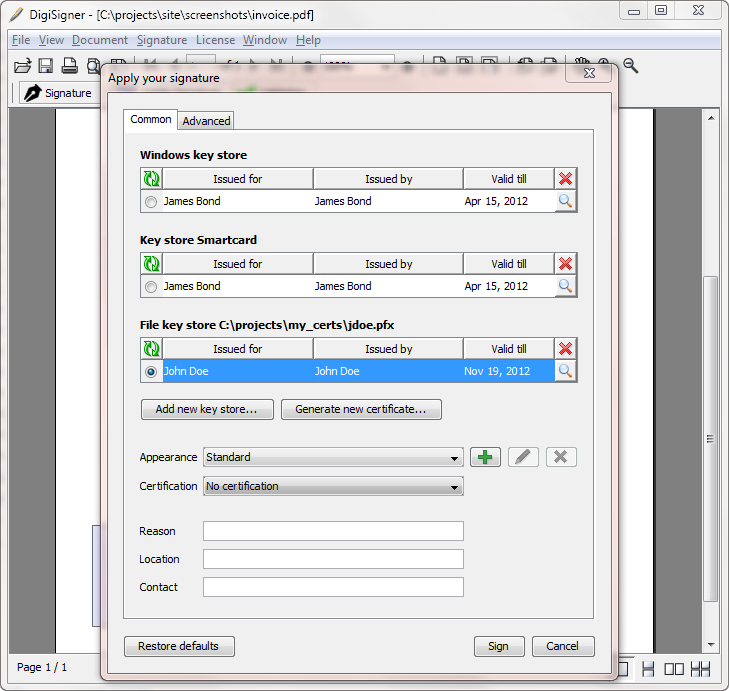
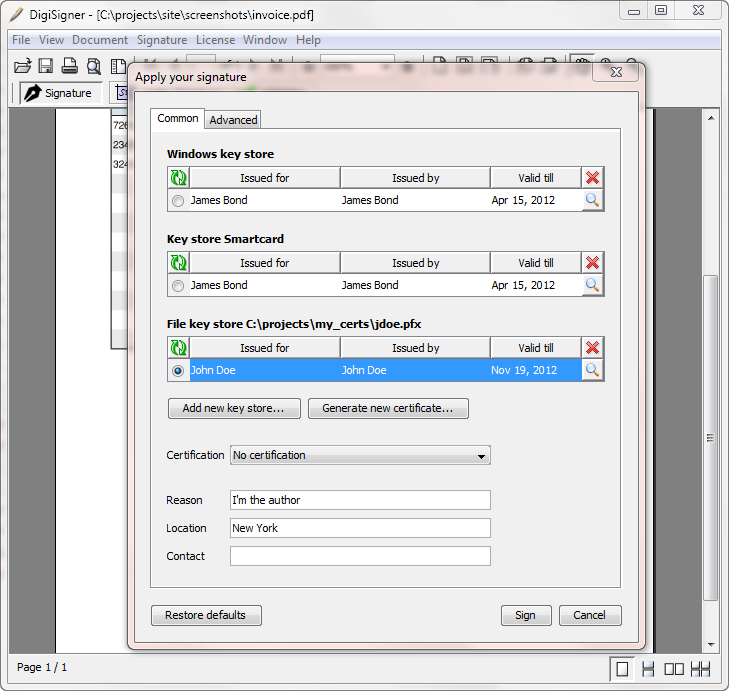
The signature dialog will appear immediately.
(Click on image to enlarge)
As you see it has two tabs. In the first tab there is a list of key stores that were added to DigiSigner. On our screenshot there is the internal Windows key store and a smartcard. By default you will see a demo key store with one demo certificate and, if you are on Windows, also Windows internal key store.
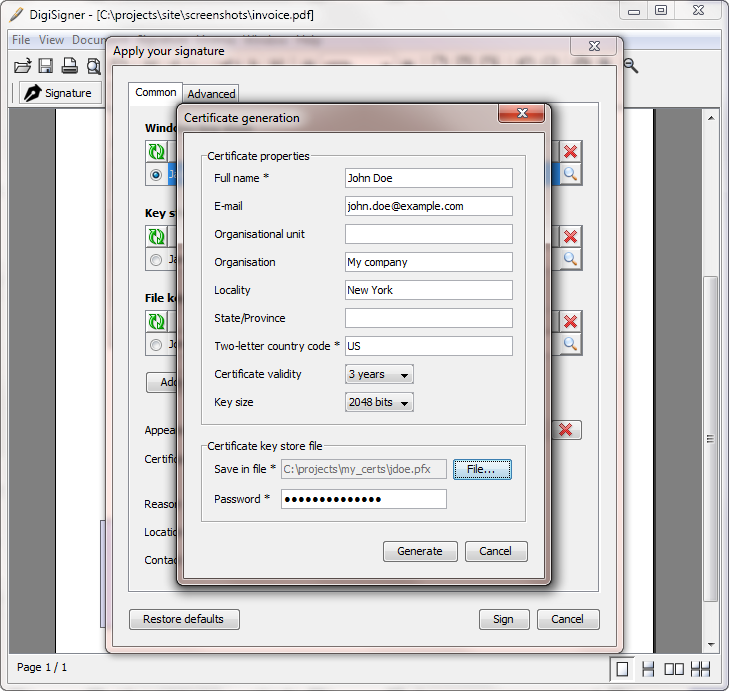
If you don't have your own certificate, you can generate one using DigiSigner certificate generation feature. To do this just click on the Generate new certificate... button and enter your personal information.
(Click on image to enlarge)
You will have to enter at least your name and two-letter country code, like 'US' or 'DE'. Also you have to specify the key store file to hold your generated certificate and the password for it. If you forget the password, you won't be able to use your certificate any more. All other information you can enter is optional. Click on Generate button to generate your certificate. After generation it will appear in the signature dialog. You can now skip the information about adding your existing key stores to DigiSigner and go to directly to the signature configuration part of the tutorial.
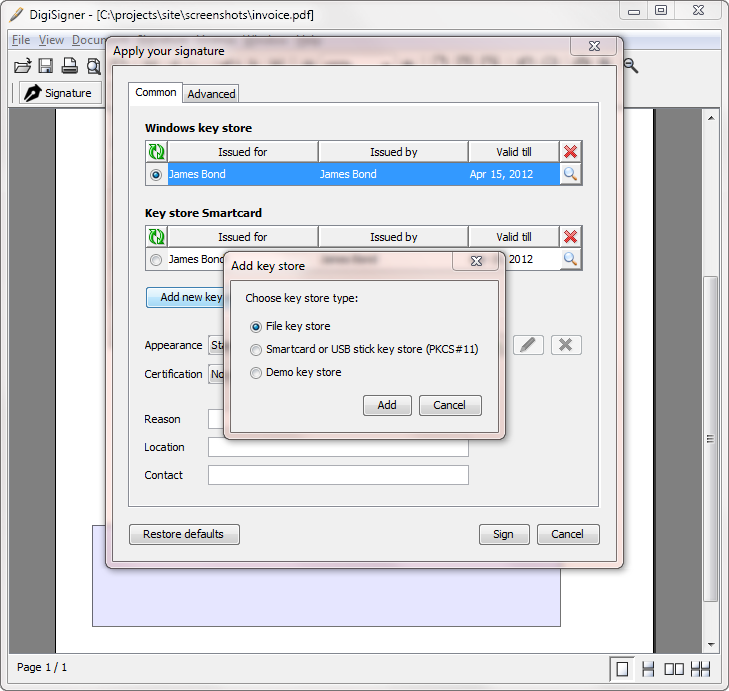
If you don't want to generate new certificate, because you already have one you can register it with DigiSigner by clicking on Add new key store... button. The dialog will appear to let you choose the key store type you want to add.
(Click on image to enlarge)
If you generated your certificate using third party tools like keytool or openssl or bought one from a certificate authority, then it will normally be in a file key store. In this case choose File key store option, click Add button, choose your key store file and enter the password you specified during the certificate generation process. If everything was OK, your key store with all valid certificates in it will appear in the Common tab.
(Click on image to enlarge)
If you have your certificates on a smartcard (or a USB stick) and you are on Windows, the chances are good that your certificates will appear in the Windows key store automatically. This will happen if Windows supports your type of smartcard out of the box or you have already installed a corresponding Cryptographic Service Provider for your card (should be available from your smartcard manufacturer). If it is not the case or you are not on Windows you can register your smartcard with DigiSigner using the option Smartcard or USB stick key store (PKCS#11) from Add key store dialog. In this case you will have to choose a PKCS#11 library file, which is normally provided by the smartcard manufacturer. You can also give a remarkable name to your key store.

All key stores can be reloaded or removed from DigiSigner using corresponding buttons in the head of each key store. To see the information saved in every certificate just click on the corresponding magnifier button.
In the Common tab you can also add new signature appearance. Click on the button with plus sign to open the dialog with appearance settings.
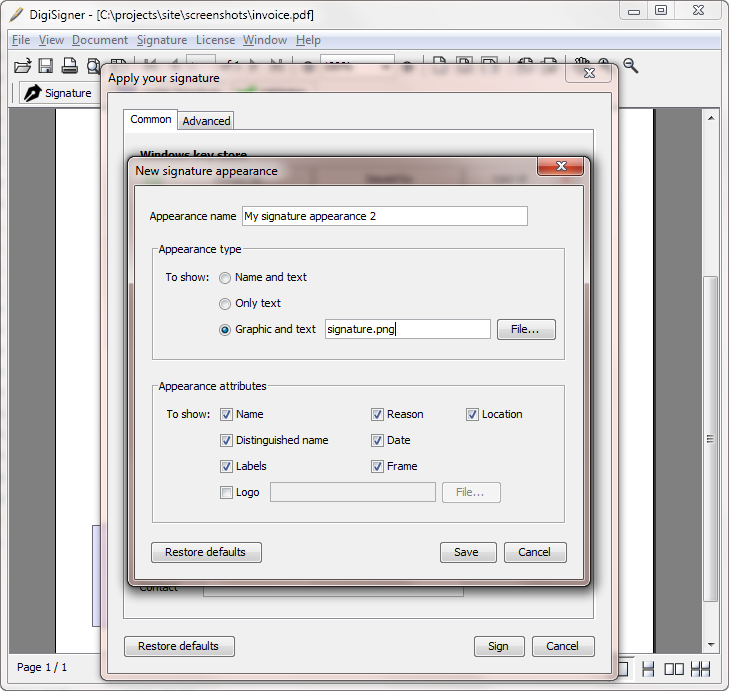
(Click on image to enlarge)
The standard signature view is your name on the left side and some additional signature text on the right side, which includes normally your name, your distinguished name (how it is defined in the certificate) and also reason, location and the date of signing. You can choose to use some graphic instead of your name on the left side (for example your handwritten signature or some other image) or you can have only signature text in your signature field. These three options can be chosen in the Appearance type area.
The signature text itself and some other attributes can be customized in the Appearance attributes area. One interesting option Logo lets you specify an image in the background of the signature. After you have configured your signature, click on Save to save it. Later you can always edit or delete your signature appearances, using the corresponding buttons near the combo box with signature appearances.
Another combo box Certification lets you define, what changes on the document you want to allow or disallow after the document is signed. Normally, some kinds of changes are allowed even in signed documents (under allowed I mean they don't break the signature). These are, for example, creating annotations, form fillings and subsequent signatures. You can disallow those changes by choosing a corresponding certification level for your signature. Please note, that in every document there can be only one signature with a certification level, so called certifying signature.
In the Common tab you can also optionally specify the reason, why you sign the document. It could be something like "I am the author of the document" or "I approve the document" or something else like this. You can also optionally specify the location (usually your city) and how you can be contacted by the document receiver (here you can, for example, enter your email address).
Now let's switch to the Advanced tab. All settings in this tab are optional, so you can skip their description, if you don't want to use any advanced settings.
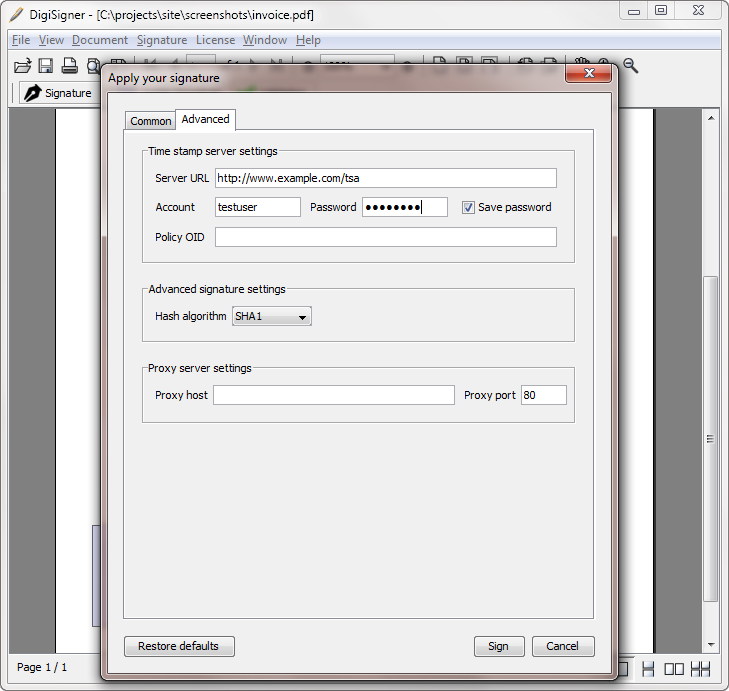
(Click on image to enlarge)
Here you have the possibility to enter the settings for the time stamp server. This is a server, which will provide DigiSigner with current date and time. The information, that the signature time was provided not by your local computer (which can always can manipulated), but by some respectable time stamp server, will be embedded in your signature. This makes your signature more trustworthy, provided the time stamp server, you are using, is also a trustworthy server. One example of a time stamp service is DigiStamp. Policy OID is an optional field and is normally empty. The time stamp server owner can define different policies for time stamp generation, and in this case you will be informed, what policies in what cases you should use.
If you are going to use some time stamp server and you access the Internet through a proxy server, you have to enter your proxy server settings.
The last option on this tab is the ability to choose a hash algorithm for your signature. The more the number in the name of the algorithm, the stronger it is. SHA1 is the weakest algorithm (but it is still OK for most cases), SHA512 is the strongest algorithm. Please note, that certificates from the internal Windows key store support currently only SHA1. This is a Java limitation.
After you have configured your signature settings, choose in the Common tab the certificate you want to use for signing by clicking on it and start the signing process using the Sign button. You can also start the signing process by double clicking your certificate of choice. The signing can take several seconds, depending on the size of the document. At the end of the process the signed document with the signature will be shown to you.
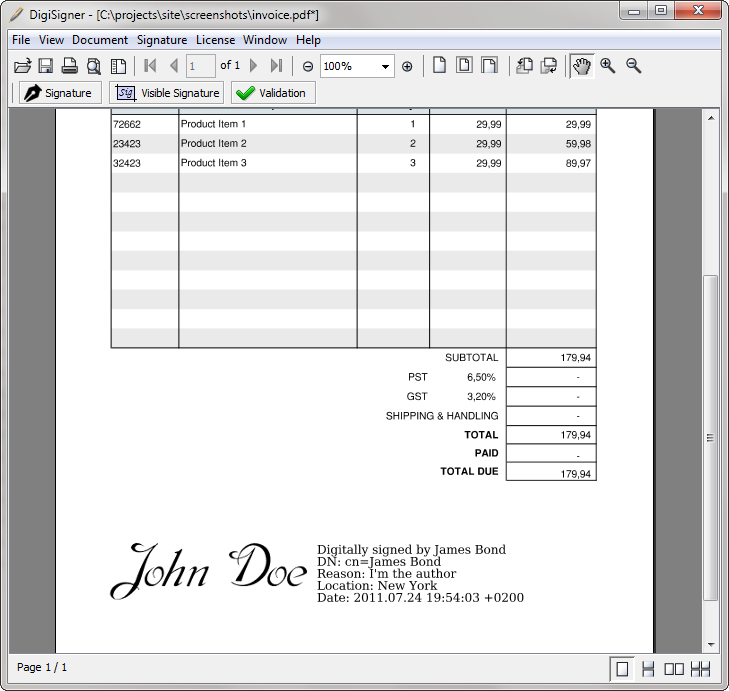
(Click on image to enlarge)
The configuration you used for signing was automatically saved so that you don't have to configure everything from scratch next time you use DigiSigner.
Now you can save your signed document by pressing Ctrl+S or by using the corresponding button in the toolbar.
How to create an invisible signature
Sometimes you don't need a visible signature to be created. An invisible signature guarantees exactly as a visible one that the document was not altered after signing and it was signed by a known person. The only difference is that the visible signature is displayed in the document and the invisible is not. Cryptographic properties are the same.
To create an invisible signature go to Signature -> Signature... menu option or click Ctrl+I. You can also click on the Signature button in the toolbar.

Immediately after that the signature dialog will appear. It will look exactly the same as the signature dialog in case of a visible signature, only without the Appearance combo box, as invisible signatures have no appearance.
(Click on image to enlarge)
The rest of the process is exactly the same as in the case of a visible signature (see How to create a visible signature for details). You should add your key store to DigiSigner, choose a certificate and optionally specify the reason and location of signing and maybe your contact information. To see all the signatures (visible or invisible) created in the document please click on the Validation button.
Visible signatures in predefined signature fields
Some PDF documents have already predefined signature fields, where future signatures should be created. That's how it looks like in DigiSigner.
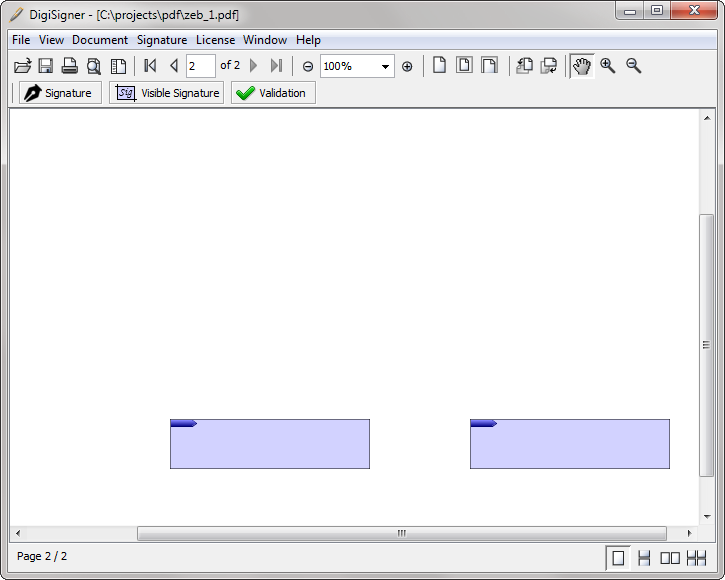
(Click on image to enlarge)
To create a digital signature in such a field just click on it. The signature dialog will appear. The rest of the process is exactly the same as by creating a normal visible signature (see How to create a visible signature).
How to verify a signature
DigiSigner is capable of verifying visible and invisible digital signatures. To verify all the signatures in the document just click on Validation button in the toolbar.

The signatures will be validated and appear in the Signature panel on the left side of the shown document.
(Click on image to enlarge)
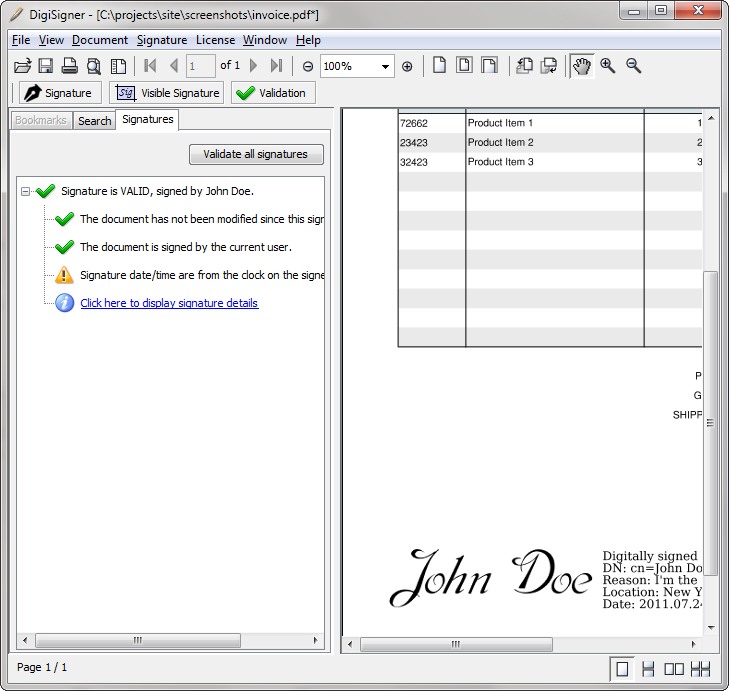
To verify a particular visible signature you should simply click on it. The signature properties dialog with the most important signature information will appear.

(Click on image to enlarge)
Here you can see if the document was modified after signing and who was the signer of the document. You can see also the reason, location and the date of the signing. To take a look at additional certificate information you should click on the Show certificate... button.
If you found any errors in the tutorial or have some suggestions please don't hesitate to contact us.
This tutorial was last updated on July 24, 2011.